I found this module very enjoyable and certainly was not as easy as I first thought it might be. I thought that the modelling aspect of the animation would be easier than creating the animation. However, I was proved wrong, especially in my case. I really struggled to get to grips with the aspect of 3d drawing and was continually getting confused and making silly errors with my vertices such as overlapping them and making horrid stretching marks. Once I had learnt to get to grips with Autodesk 3DS Max and its interface it became alot easier for me to understand and if I was to reproduce something similar it would be better as my skills have improved, it takes time.
Modelling
I really found this part of the module hard, I couldn't get my gun to look the way I wanted it to look and should of employed an easier way of going about it rather than trying things too advanced at such an early stage. My submarine and skiis where made in a more simpler way but do not look as realistic as they could be. My Q-Boat that I made after the hand in is probably the best model I made out of all of them. However, I feel that with a little bit of help my sceneries are really good in comparison to my models. I really was looking forward to making a car but after numerous failed attempts I scraped the idea.
Animating
I found this part enjoyable and easier than the modelling. I liked the ways in which you can use 3DS Max to create all sorts of movements and explosions. I did create a bomb explosion for my mountain scene but I didn't like the outcome so decided to just put in a background. I also scrapped my car scene as I could not produce a decent car and time was against me. I am suprised with the rendering time for some of my scenes when they are very very short. Knowing this now will help with other projects in the future to allow more time for renders.
Summary
I am very pleased with the outcome of my first 3d animation, I have learnt so much in so little time and look forward to experimenting more with the features available to 3DS Max. If I was to do the project again then better time planning is definitely needed.
Friday 15 April 2011
Final Trailer
When producing my trailer I had some difficulties with working in Premier Pro so used Windows Movie Maker to produce my animation. It is not as professional as with using Premier Pro but has produced a trailer. I made the video HD and had to convert the file from .WMV file to a MP4 file. I included the James Bond theme song and edited the length and sound of the production in Audacity.
This is my final trailer:
This is my final trailer:
Thursday 14 April 2011
Scene 4 - Ski off mountain
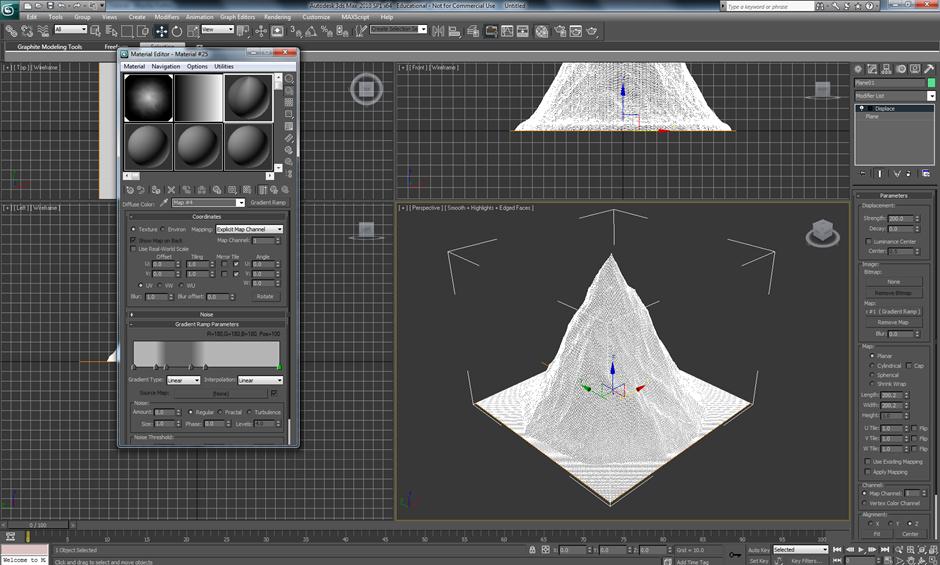
This scene is the last scene that I would make where Bond is being chased by a snow jet ski and has to ski off a mountain because of the explosion. I first created a mountain using a plane and used the displace modifier and added a gradient ramp as the map.

From here I dragged the gradient ramp map into an empty slot in the material editor and made an 'instance' copy. I edited the postioning of the flags and the colours to give a mountain look colour. I gave the material some noise and this made a mountain shaped triangle.

Changing thr output co-ordinates in the ouput parameter allowed me to make a mountain shape that I was happy with.

In a new material slot, I assigned a gradient ramp material and again added and edited flags to which I was happy with the outcome.

From here I added 3 composite layers, 2 were speckle and one was a shine material. I changed the settings as shown below:

Now that I had a mountain that I was happy with I cloned it a few times and moved them around to make a more realistic mountainous scene. I also added a daylight system to the scene and used the mr sky and mr sun settings. I also changed the location to Switzerland as I wanted the ressembelence of the Alps sunlighting. I then tried a test render and this is the outcome:

Next I merged my human body file that I created using box modeling, extrusion and symmetry that I had earlier made into this file. I then wanted to make a bone structure for which my human could move. For this I had to go to the systems panel-standard-bones.

Once I had created my bones, renamed them and added fins to them I was ready to make the limb move. For this I had to go to animation-IK solvers-IK limb solvers.

By clicking the smallest bone and the top of the second bone allowed me to have an elbow movement. I cloned the bones and put them onto the left hand side for my left arm and adjusted accordingly. I then clicked on my human and went to the modifier skin, and added all my bones to the model. This would allow the bones to move within the body hence making my person able to move.

I repeated the process for the legs, and also made sure I had a middle body bone (spine) so that the head and body would not stay where they were. I again added these to the skin modifier and merged my ski model into this file. I attached the skis to the humans feet but left the ski sticks loose so I could edit them seperately when making the animation.

I added an explosion background using a plane and gizmo till I was happy with the outcome. I used autokey on several frames to show Bond falling from the cliff down towards the ground.

I then adjusted the bones on these keyframes to make him move asif he were in mid air and doing some actions that would most probably be done to the best of my ability.

I then rendered this scene and this was the outcome:

From here I dragged the gradient ramp map into an empty slot in the material editor and made an 'instance' copy. I edited the postioning of the flags and the colours to give a mountain look colour. I gave the material some noise and this made a mountain shaped triangle.

Changing thr output co-ordinates in the ouput parameter allowed me to make a mountain shape that I was happy with.

In a new material slot, I assigned a gradient ramp material and again added and edited flags to which I was happy with the outcome.
From here I added 3 composite layers, 2 were speckle and one was a shine material. I changed the settings as shown below:

Now that I had a mountain that I was happy with I cloned it a few times and moved them around to make a more realistic mountainous scene. I also added a daylight system to the scene and used the mr sky and mr sun settings. I also changed the location to Switzerland as I wanted the ressembelence of the Alps sunlighting. I then tried a test render and this is the outcome:

Next I merged my human body file that I created using box modeling, extrusion and symmetry that I had earlier made into this file. I then wanted to make a bone structure for which my human could move. For this I had to go to the systems panel-standard-bones.

Once I had created my bones, renamed them and added fins to them I was ready to make the limb move. For this I had to go to animation-IK solvers-IK limb solvers.

By clicking the smallest bone and the top of the second bone allowed me to have an elbow movement. I cloned the bones and put them onto the left hand side for my left arm and adjusted accordingly. I then clicked on my human and went to the modifier skin, and added all my bones to the model. This would allow the bones to move within the body hence making my person able to move.

I repeated the process for the legs, and also made sure I had a middle body bone (spine) so that the head and body would not stay where they were. I again added these to the skin modifier and merged my ski model into this file. I attached the skis to the humans feet but left the ski sticks loose so I could edit them seperately when making the animation.

I added an explosion background using a plane and gizmo till I was happy with the outcome. I used autokey on several frames to show Bond falling from the cliff down towards the ground.

I then adjusted the bones on these keyframes to make him move asif he were in mid air and doing some actions that would most probably be done to the best of my ability.

I then rendered this scene and this was the outcome:
Scene 3 - Submarine Underwater
For this scene I wanted to make the submarine dive underwater like in the film and have it crash to the bottom of the sea (my screen). For the start I made a plane and added the displace modifier and adjusted the strength.

I next added a noise map to this modifier and opened the material editor. Here I dragged the noise map into an empty slot and made an 'instance' copy. Here I edited the settings of the noise map.

From here I opened a new material slot and added arch & design mental ray-water,reflective surface from the materials panel and set transparency to 1. Next I went to special purpose maps and changed the size of the bump making largest 100 and smallest 1. From here I added an environment map by going to render-environment, and added a gradient map. Again I dragged this and copied as an 'instance' in a new material slot.
 Next I changed the colour of the flags and added a noise parameter and edited accordingly.

I then added a camera and a target spot light to the scene. I put the camera underwater and the light above shining down through the top of the water acting like the sun. I also added another environment but this time added a fog atmosphere and fog gradient ramp environment map. I again copied over to an empty material panel. Here I changed the settings so that the gradient was in the y-axis and changed the colour of the flags again.

I next merged my submarine file with this file and edited my submarine. For this I used autokey, on the properler blades I clicked on frame 10 and rotated 180 degrees and added a loop using the curve editor. This would repeat the same motion every 10 frames throughout the animation. I then on different frames adjusted the positioning and rotation of the submarine to look like it was diving. The track curve editor map is show below to demonstrate the effect it had on my animation.

Below is the finished outcome of this scene:

I next added a noise map to this modifier and opened the material editor. Here I dragged the noise map into an empty slot and made an 'instance' copy. Here I edited the settings of the noise map.

From here I opened a new material slot and added arch & design mental ray-water,reflective surface from the materials panel and set transparency to 1. Next I went to special purpose maps and changed the size of the bump making largest 100 and smallest 1. From here I added an environment map by going to render-environment, and added a gradient map. Again I dragged this and copied as an 'instance' in a new material slot.
 Next I changed the colour of the flags and added a noise parameter and edited accordingly.
I then added a camera and a target spot light to the scene. I put the camera underwater and the light above shining down through the top of the water acting like the sun. I also added another environment but this time added a fog atmosphere and fog gradient ramp environment map. I again copied over to an empty material panel. Here I changed the settings so that the gradient was in the y-axis and changed the colour of the flags again.

I next merged my submarine file with this file and edited my submarine. For this I used autokey, on the properler blades I clicked on frame 10 and rotated 180 degrees and added a loop using the curve editor. This would repeat the same motion every 10 frames throughout the animation. I then on different frames adjusted the positioning and rotation of the submarine to look like it was diving. The track curve editor map is show below to demonstrate the effect it had on my animation.

Below is the finished outcome of this scene:
Scene 2 - Q-Boat on Thames
This part of my animation is where Bond is in the Q-Boat chasing along the Thames. For this scene I first had to create the water for which the boat would drive along. To get my water plane I went to space warps-reactor-water. I changed the wave speed and min/max ripples.

Aswell as changing the wave speed and the min/max ripple again, I also changed the maxdepth so that the water would not be flat.

Next I created a plane that was just bigger then the water reactor, and attached them by using the bind to space warp action. Next on the plane I added a subdivide modifier and a reactor water modifier. In this modifier I changed the scale strength to 5.

Next was to apply a material to both the water reactor and the plane, to do this I opened up the material editor and used the pro materials: water using the mental ray render setup. From here I could choose what type of water I wanted. I chose stream or river and then chose a custom colour, I also applied a wave height.

Next was to add a daylight system so that the environment around my scene looked like it was in daytime. For this I went to create-lights-daylight system. I then moved the compass and light around till I was happy with the positioning and applied mr sun and mr sky to the modifier. Next I changed the location to London.

When I was happy with this I created a wall that would represent the thames wall and keep the water in my scene without it looking unrealistic. I then merged my q-boat file which I had earlier created using box modeling and extruding, into this file. I then done a test render to see how the image looked. This is shown below:

When I was happy with the outcome I thought about adding a background to make the scenery look like that it was situated along the Thames. For this I created a plane and then applied a millenium dome image to this. Editing around with the image using UVW Map, gizmo until I was happy with the size and postioning of my background picture. I also applied a target camera to the scene that would follow the boat moving along the Thames.

Next was to apply some animation to the scene, to do this using autokey I moved the boat along a bit and rotated to create the effect of the boat riding a wave and then dropping back down again. This would happen between the 1st and 30th frame. To repeat the process I used track view-curve editor. Here I could apply the parameter, curve out-of-range types. I used the function loop, this made the boat move along the same distance and rotate the same every 30 frames.

Last was to make sure that the camera followed the boat so I edited the rotation at several points along the timeline using autokey.
Below is the finished outcome of the scene:
Scene 1 - Gun
For this scene I created a bullet using a picture from the internet and opened illustrator, from here I drew round half of the bullet and saved as an illustrator 3 file. This file was then imported into 3ds Max, from here I moved the pivot point to the middle of the drawing and then used the lathe modifier and made to go in the x-axis. I then applied materials using the mental ray materials. I then merged this file with my gun file.

From here I created a motion path using a circle. To do this I created a circle using the splines drawing tool. Next I created a target camera and attached it to the circle by creating a motion path. To do this I clicked on the camera and went to animation-constraints-path constraints, and linked it to the circle.

This attached the camera to the circle path, here I had to rotate the camera so that it was following the path and looking at the gun. To do this I had to make sure that the camera was set to follow on the parameters section.

This when looking through the camera view shows the gun rotating in the x-axis direction, but what is really happening is the camera is orbiting around the gun. Next I created the path for which the camera would follow when the gun fires the bullet. For this I went to the spline panel and created a line on frame 100 where the camera was already located. Like before whilst on the line I went to animation-constraints-path constraints and attached the line to the camera. I altered the settings and the camera would follow along the x-axis level with the bullet when it is fired. I also had to make sure that the circle path was deleted between frames 100-250 so the camera went in a straight line and not a semi-circle off the line and back onto it.

Next I cloned the line I just drew so that the bullet could follow this. I made sure the same settings were set on both the camera and bullet paths, and timings were the same using autokey, and settings panel for path constraints.

Lastly, I edited my trigger by rotating and moving accordingly whilst in autokey. It is hard to see as it is a very short clip. When rendering the video I rendered the first 100 frames then the second 150 afterwards, giving me two animations. These are displayed below:
Tuesday 29 March 2011
Week 10 - Bowling
In this tutorial we created a bowling alley. We used the download file which had the template for our bowling alley and added all the elements to the Rigid Body Collection. From here we selected all the pins and gave them a mass of 10, the alley floor a mass of 0 and the ball a mass of 20.  Below is the changing of the Col. Tolerance from 3.9 to 0.6. This is because the pins were jumping up so by reducing it the gap was made alot smaller.
  We used the autokey and clicked of frame 5 and moved the ball forward along the alley and this stopped the ball from dropping off the screen and made the ball move along the alley and hit the pins. Next I edited the ball by applying spin using the rotate tool.
  By changing the friction on both the ball and the alley, made the ball stick better and stopped it from bouncing onto the pins. I changed the colour of the elements to make the bowling more realistic.
Below is the changing of the Col. Tolerance from 3.9 to 0.6. This is because the pins were jumping up so by reducing it the gap was made alot smaller. We used the autokey and clicked of frame 5 and moved the ball forward along the alley and this stopped the ball from dropping off the screen and made the ball move along the alley and hit the pins. Next I edited the ball by applying spin using the rotate tool. By changing the friction on both the ball and the alley, made the ball stick better and stopped it from bouncing onto the pins. I changed the colour of the elements to make the bowling more realistic. 
Below is my rendered animation of my bowling scene:
Subscribe to:
Posts (Atom)