I found this module very enjoyable and certainly was not as easy as I first thought it might be. I thought that the modelling aspect of the animation would be easier than creating the animation. However, I was proved wrong, especially in my case. I really struggled to get to grips with the aspect of 3d drawing and was continually getting confused and making silly errors with my vertices such as overlapping them and making horrid stretching marks. Once I had learnt to get to grips with Autodesk 3DS Max and its interface it became alot easier for me to understand and if I was to reproduce something similar it would be better as my skills have improved, it takes time.
Modelling
I really found this part of the module hard, I couldn't get my gun to look the way I wanted it to look and should of employed an easier way of going about it rather than trying things too advanced at such an early stage. My submarine and skiis where made in a more simpler way but do not look as realistic as they could be. My Q-Boat that I made after the hand in is probably the best model I made out of all of them. However, I feel that with a little bit of help my sceneries are really good in comparison to my models. I really was looking forward to making a car but after numerous failed attempts I scraped the idea.
Animating
I found this part enjoyable and easier than the modelling. I liked the ways in which you can use 3DS Max to create all sorts of movements and explosions. I did create a bomb explosion for my mountain scene but I didn't like the outcome so decided to just put in a background. I also scrapped my car scene as I could not produce a decent car and time was against me. I am suprised with the rendering time for some of my scenes when they are very very short. Knowing this now will help with other projects in the future to allow more time for renders.
Summary
I am very pleased with the outcome of my first 3d animation, I have learnt so much in so little time and look forward to experimenting more with the features available to 3DS Max. If I was to do the project again then better time planning is definitely needed.
Friday 15 April 2011
Final Trailer
When producing my trailer I had some difficulties with working in Premier Pro so used Windows Movie Maker to produce my animation. It is not as professional as with using Premier Pro but has produced a trailer. I made the video HD and had to convert the file from .WMV file to a MP4 file. I included the James Bond theme song and edited the length and sound of the production in Audacity.
This is my final trailer:
This is my final trailer:
Thursday 14 April 2011
Scene 4 - Ski off mountain
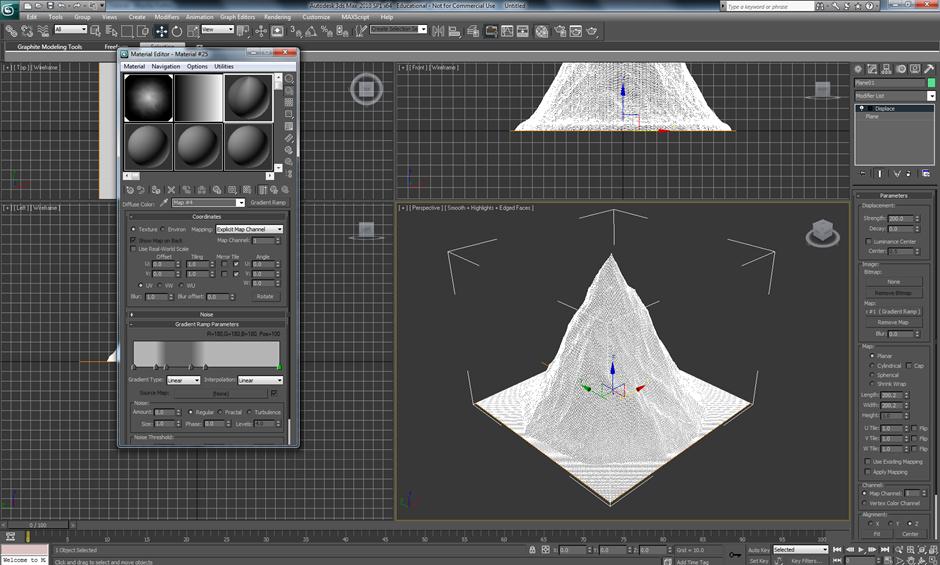
This scene is the last scene that I would make where Bond is being chased by a snow jet ski and has to ski off a mountain because of the explosion. I first created a mountain using a plane and used the displace modifier and added a gradient ramp as the map.

From here I dragged the gradient ramp map into an empty slot in the material editor and made an 'instance' copy. I edited the postioning of the flags and the colours to give a mountain look colour. I gave the material some noise and this made a mountain shaped triangle.

Changing thr output co-ordinates in the ouput parameter allowed me to make a mountain shape that I was happy with.

In a new material slot, I assigned a gradient ramp material and again added and edited flags to which I was happy with the outcome.

From here I added 3 composite layers, 2 were speckle and one was a shine material. I changed the settings as shown below:

Now that I had a mountain that I was happy with I cloned it a few times and moved them around to make a more realistic mountainous scene. I also added a daylight system to the scene and used the mr sky and mr sun settings. I also changed the location to Switzerland as I wanted the ressembelence of the Alps sunlighting. I then tried a test render and this is the outcome:

Next I merged my human body file that I created using box modeling, extrusion and symmetry that I had earlier made into this file. I then wanted to make a bone structure for which my human could move. For this I had to go to the systems panel-standard-bones.

Once I had created my bones, renamed them and added fins to them I was ready to make the limb move. For this I had to go to animation-IK solvers-IK limb solvers.

By clicking the smallest bone and the top of the second bone allowed me to have an elbow movement. I cloned the bones and put them onto the left hand side for my left arm and adjusted accordingly. I then clicked on my human and went to the modifier skin, and added all my bones to the model. This would allow the bones to move within the body hence making my person able to move.

I repeated the process for the legs, and also made sure I had a middle body bone (spine) so that the head and body would not stay where they were. I again added these to the skin modifier and merged my ski model into this file. I attached the skis to the humans feet but left the ski sticks loose so I could edit them seperately when making the animation.

I added an explosion background using a plane and gizmo till I was happy with the outcome. I used autokey on several frames to show Bond falling from the cliff down towards the ground.

I then adjusted the bones on these keyframes to make him move asif he were in mid air and doing some actions that would most probably be done to the best of my ability.

I then rendered this scene and this was the outcome:

From here I dragged the gradient ramp map into an empty slot in the material editor and made an 'instance' copy. I edited the postioning of the flags and the colours to give a mountain look colour. I gave the material some noise and this made a mountain shaped triangle.

Changing thr output co-ordinates in the ouput parameter allowed me to make a mountain shape that I was happy with.

In a new material slot, I assigned a gradient ramp material and again added and edited flags to which I was happy with the outcome.
From here I added 3 composite layers, 2 were speckle and one was a shine material. I changed the settings as shown below:

Now that I had a mountain that I was happy with I cloned it a few times and moved them around to make a more realistic mountainous scene. I also added a daylight system to the scene and used the mr sky and mr sun settings. I also changed the location to Switzerland as I wanted the ressembelence of the Alps sunlighting. I then tried a test render and this is the outcome:

Next I merged my human body file that I created using box modeling, extrusion and symmetry that I had earlier made into this file. I then wanted to make a bone structure for which my human could move. For this I had to go to the systems panel-standard-bones.

Once I had created my bones, renamed them and added fins to them I was ready to make the limb move. For this I had to go to animation-IK solvers-IK limb solvers.

By clicking the smallest bone and the top of the second bone allowed me to have an elbow movement. I cloned the bones and put them onto the left hand side for my left arm and adjusted accordingly. I then clicked on my human and went to the modifier skin, and added all my bones to the model. This would allow the bones to move within the body hence making my person able to move.

I repeated the process for the legs, and also made sure I had a middle body bone (spine) so that the head and body would not stay where they were. I again added these to the skin modifier and merged my ski model into this file. I attached the skis to the humans feet but left the ski sticks loose so I could edit them seperately when making the animation.

I added an explosion background using a plane and gizmo till I was happy with the outcome. I used autokey on several frames to show Bond falling from the cliff down towards the ground.

I then adjusted the bones on these keyframes to make him move asif he were in mid air and doing some actions that would most probably be done to the best of my ability.

I then rendered this scene and this was the outcome:
Scene 3 - Submarine Underwater
For this scene I wanted to make the submarine dive underwater like in the film and have it crash to the bottom of the sea (my screen). For the start I made a plane and added the displace modifier and adjusted the strength.

I next added a noise map to this modifier and opened the material editor. Here I dragged the noise map into an empty slot and made an 'instance' copy. Here I edited the settings of the noise map.

From here I opened a new material slot and added arch & design mental ray-water,reflective surface from the materials panel and set transparency to 1. Next I went to special purpose maps and changed the size of the bump making largest 100 and smallest 1. From here I added an environment map by going to render-environment, and added a gradient map. Again I dragged this and copied as an 'instance' in a new material slot.
 Next I changed the colour of the flags and added a noise parameter and edited accordingly.

I then added a camera and a target spot light to the scene. I put the camera underwater and the light above shining down through the top of the water acting like the sun. I also added another environment but this time added a fog atmosphere and fog gradient ramp environment map. I again copied over to an empty material panel. Here I changed the settings so that the gradient was in the y-axis and changed the colour of the flags again.

I next merged my submarine file with this file and edited my submarine. For this I used autokey, on the properler blades I clicked on frame 10 and rotated 180 degrees and added a loop using the curve editor. This would repeat the same motion every 10 frames throughout the animation. I then on different frames adjusted the positioning and rotation of the submarine to look like it was diving. The track curve editor map is show below to demonstrate the effect it had on my animation.

Below is the finished outcome of this scene:

I next added a noise map to this modifier and opened the material editor. Here I dragged the noise map into an empty slot and made an 'instance' copy. Here I edited the settings of the noise map.

From here I opened a new material slot and added arch & design mental ray-water,reflective surface from the materials panel and set transparency to 1. Next I went to special purpose maps and changed the size of the bump making largest 100 and smallest 1. From here I added an environment map by going to render-environment, and added a gradient map. Again I dragged this and copied as an 'instance' in a new material slot.
 Next I changed the colour of the flags and added a noise parameter and edited accordingly.
I then added a camera and a target spot light to the scene. I put the camera underwater and the light above shining down through the top of the water acting like the sun. I also added another environment but this time added a fog atmosphere and fog gradient ramp environment map. I again copied over to an empty material panel. Here I changed the settings so that the gradient was in the y-axis and changed the colour of the flags again.

I next merged my submarine file with this file and edited my submarine. For this I used autokey, on the properler blades I clicked on frame 10 and rotated 180 degrees and added a loop using the curve editor. This would repeat the same motion every 10 frames throughout the animation. I then on different frames adjusted the positioning and rotation of the submarine to look like it was diving. The track curve editor map is show below to demonstrate the effect it had on my animation.

Below is the finished outcome of this scene:
Scene 2 - Q-Boat on Thames
This part of my animation is where Bond is in the Q-Boat chasing along the Thames. For this scene I first had to create the water for which the boat would drive along. To get my water plane I went to space warps-reactor-water. I changed the wave speed and min/max ripples.

Aswell as changing the wave speed and the min/max ripple again, I also changed the maxdepth so that the water would not be flat.

Next I created a plane that was just bigger then the water reactor, and attached them by using the bind to space warp action. Next on the plane I added a subdivide modifier and a reactor water modifier. In this modifier I changed the scale strength to 5.

Next was to apply a material to both the water reactor and the plane, to do this I opened up the material editor and used the pro materials: water using the mental ray render setup. From here I could choose what type of water I wanted. I chose stream or river and then chose a custom colour, I also applied a wave height.

Next was to add a daylight system so that the environment around my scene looked like it was in daytime. For this I went to create-lights-daylight system. I then moved the compass and light around till I was happy with the positioning and applied mr sun and mr sky to the modifier. Next I changed the location to London.

When I was happy with this I created a wall that would represent the thames wall and keep the water in my scene without it looking unrealistic. I then merged my q-boat file which I had earlier created using box modeling and extruding, into this file. I then done a test render to see how the image looked. This is shown below:

When I was happy with the outcome I thought about adding a background to make the scenery look like that it was situated along the Thames. For this I created a plane and then applied a millenium dome image to this. Editing around with the image using UVW Map, gizmo until I was happy with the size and postioning of my background picture. I also applied a target camera to the scene that would follow the boat moving along the Thames.

Next was to apply some animation to the scene, to do this using autokey I moved the boat along a bit and rotated to create the effect of the boat riding a wave and then dropping back down again. This would happen between the 1st and 30th frame. To repeat the process I used track view-curve editor. Here I could apply the parameter, curve out-of-range types. I used the function loop, this made the boat move along the same distance and rotate the same every 30 frames.

Last was to make sure that the camera followed the boat so I edited the rotation at several points along the timeline using autokey.
Below is the finished outcome of the scene:
Scene 1 - Gun
For this scene I created a bullet using a picture from the internet and opened illustrator, from here I drew round half of the bullet and saved as an illustrator 3 file. This file was then imported into 3ds Max, from here I moved the pivot point to the middle of the drawing and then used the lathe modifier and made to go in the x-axis. I then applied materials using the mental ray materials. I then merged this file with my gun file.

From here I created a motion path using a circle. To do this I created a circle using the splines drawing tool. Next I created a target camera and attached it to the circle by creating a motion path. To do this I clicked on the camera and went to animation-constraints-path constraints, and linked it to the circle.

This attached the camera to the circle path, here I had to rotate the camera so that it was following the path and looking at the gun. To do this I had to make sure that the camera was set to follow on the parameters section.

This when looking through the camera view shows the gun rotating in the x-axis direction, but what is really happening is the camera is orbiting around the gun. Next I created the path for which the camera would follow when the gun fires the bullet. For this I went to the spline panel and created a line on frame 100 where the camera was already located. Like before whilst on the line I went to animation-constraints-path constraints and attached the line to the camera. I altered the settings and the camera would follow along the x-axis level with the bullet when it is fired. I also had to make sure that the circle path was deleted between frames 100-250 so the camera went in a straight line and not a semi-circle off the line and back onto it.

Next I cloned the line I just drew so that the bullet could follow this. I made sure the same settings were set on both the camera and bullet paths, and timings were the same using autokey, and settings panel for path constraints.

Lastly, I edited my trigger by rotating and moving accordingly whilst in autokey. It is hard to see as it is a very short clip. When rendering the video I rendered the first 100 frames then the second 150 afterwards, giving me two animations. These are displayed below:
Tuesday 29 March 2011
Week 10 - Bowling
In this tutorial we created a bowling alley. We used the download file which had the template for our bowling alley and added all the elements to the Rigid Body Collection. From here we selected all the pins and gave them a mass of 10, the alley floor a mass of 0 and the ball a mass of 20.  Below is the changing of the Col. Tolerance from 3.9 to 0.6. This is because the pins were jumping up so by reducing it the gap was made alot smaller.
  We used the autokey and clicked of frame 5 and moved the ball forward along the alley and this stopped the ball from dropping off the screen and made the ball move along the alley and hit the pins. Next I edited the ball by applying spin using the rotate tool.
  By changing the friction on both the ball and the alley, made the ball stick better and stopped it from bouncing onto the pins. I changed the colour of the elements to make the bowling more realistic.
Below is the changing of the Col. Tolerance from 3.9 to 0.6. This is because the pins were jumping up so by reducing it the gap was made alot smaller. We used the autokey and clicked of frame 5 and moved the ball forward along the alley and this stopped the ball from dropping off the screen and made the ball move along the alley and hit the pins. Next I edited the ball by applying spin using the rotate tool. By changing the friction on both the ball and the alley, made the ball stick better and stopped it from bouncing onto the pins. I changed the colour of the elements to make the bowling more realistic. 
Below is my rendered animation of my bowling scene:
Week 10 - Using Reactor
For this tutorial we were introduced to the Rigid Body Collection, this allows you to edit masses, gravity and friction. First, I created two boxes, one which would be the ground and the other would be an object that fell onto this. I rotated the smaller box and used the Rigid Body Collection and clicked on the screen and added the two boxes using the add button in the modifier panel for RBC. Next I went to the systems panel and selected reactor, and this is where you can edit the properties of the objects.

It was important to make sure that the ground boxes mass was 0 as we didn't want that to drop, but the box above was >0. I changed this mass to 5. To preview the animation you click the 'preview animation' button, then 'preview in window.' When I was happy I clicked the 'create animation' just above the preview button.
This put it into the timeline and cannot be changed from here. I rendered my animation and this is the outcome:
Tuesday 22 March 2011
Week 9 - Head
This tutorial we were to create an animation of a face and some actions that we would do. After importing the object file, we converted it to an editable poly and then made 5 clones of the head. Next we chose one of the heads and clicked on edit polygon and clicked a segment on the lip. By clicking grow it would select surrounding segments.


My animation of the face is shown below:
We continued to do this for the other four faces. Below is the 5 faces that I had created. I have an open mouth, closed mouth, eyebrows up and teeth showing.
Next was to click on our first original face that we hadn't edited and to click the turbosmooth modifier, and also to click the morpher modifier. Here is were we add the other faces, by clicking the empty channel and scrolling down to pick object from scene and clicking a face would add to our morpher channels, here we could adjust the values of how much we wish to see of our movement.
By using auto key and clicking on different frames we could create an animation and by clicking the adjustments on different channels. By looking at the curve editor we were able to select single channels and edit them easier and quicker than looking at the timeline.
My animation of the face is shown below:
Week 8 - Bones
In this tutorial we were to connect bones to a human body to help make a realistic animation. After importing the body object file into 3ds Max, bones were created using the ik limbs solver.


Below is my animation of the body moving:
Once both arms and spine were created and named correctly, the next thing to do was to go to the modifier tab and click skin. Here we could add the named bones by going to envelope, add bones. Once this had been done we could individually edit the movement of each bone.
Once we were happy with the outcome we used the auto key to create a simple animation showing the movement of the arms. Changing the render format would also show the result as a video.
Below is my animation of the body moving:
Tuesday 8 March 2011
Bouncing Ball Tutorial
This tutorial was a basic to animation in 3ds Max, we created a sphere and used the timeline at the bottom to help us create an animation. By selecting autokey and dragging the timeline slider to a frame you can then move, rotate or resize the ball. For my animation I moved the ball vertically to show the ball was bouncing and then cloned the first frame to an end frame to end the clip. Now the ball was bouncing but did not look realistic, so to edit this we went to the graphics editor, track view - curve editor. When here you see a graph showing the z axis and by selecting that you can edit how the ball will bounce. By clicking the first point of the graph (at the bottom) and clicking set tangents to fast, made a more realistic up bounce, and do the same for the last point. This gave a more rounded bounce, by selecting the top of the graph point and dragging the end points allowed the curve to give more time in the air and give a realistic bounce.
Whilst in the curve editor select out of range types and click cycle and this will repeat the bounce throughout the animation.
Next I cloned my ball (making sure that autokey was not selected) and opening the track view - dope sheet and selecting edit ranges, allows you to change the time for each ball, making some quicker or some longer then others and maybe starting them and different times.
Friday 4 March 2011
My Submarine model

This is my submarine that I created, I used a sphere and stretched it to created the body and then selected certain edges to expand and shrink to make the head and tail of the body. I attached and box to the top and extruded pologons to make the shape, I then used the line tool to create the tail of the submarine and extruded it to make it a pologon. I edited the poly and attached that to the base, where I also added a properler using a sphere and stretching and shrinking, I rotated the blade and then cloned that, and rotated that one to make a 'x' shaped blade. I then added a plane to make a lookalike window and cloned this 5 times so there was an equal gap.
My Ski model

This is my rendered version of the model for my skiis. I used soft selection and chamfer for the tip of my ski, and for the boot caps i used a line and loft to create the holdal. The ski sticks were created using a cylinder and extruding one end and then beveling it to make a sharp point, and the handle was created using a line and then lathe, this was then connected using the connect tool in compound objects.
My Walther P99 model

This is my model of the Walther P99, I have tried many techniques to try and make this as realistic as I possible could. I used a reference plane to help with the outline of the gun and used the line tool and extruded it to make it a 3dimensional shape, I used other techniques such as chamfer, extrude, connect and boolean. I want to try and make this model alot more realistic and add some detail but am very proud of what I have achieved within the short amount of time of learning the software. I experienced problems when trying to add detail so will need to work on that, however I am happy with my results.
Storyboard
 This is my storyboard for the film, The world is not enough. My trailer which is to be 30 seconds long starts off with Bond firing a bullet from the Walther P99 which will fly across a black screen and evolve into the Q-Boat which is skimming the water of the thames, and along the roadside will be the BMW Z8 which is going to be traveling on the road going the opposite direction to the Q-Boat. Next we will see the Submarine as the car passes by and will see the crash of the submarine with the sea bed and this explosion will be carried into the last scene with the skiing as we see Bond hurling towards the screen. Then a white screen will appear with the text of the World is Not Enough 007.
The James Bond soundtrack will be used throughout the trailer and I hope to be able to add sound effects for each model and explosion to create the best experience for the viewer.
Moodboard - Submarine

In the film the submarine is the climax to the film and this is where the plot to end the world takes place. The submarine however crashes into the bottom of the seabed and starts to flood. Bond has to stop Renard from inserting the gold rod and this is where he saves the world. I would like to recreate the submarine and the crash for my trailer.
Moodboard - Ski

In the film Bond has to escape from powered jet mobiles whilst skiing down a mountain. The explosion is when the two mobiles collide and hitting an explosive. This scene would be really good to have in my scene and am going to create the skis for which my Bond figure will use.
Moodboard - Walther P99

In every James Bond film there is a gun in which he uses. For my film the world is not enough, the main gun is the Walther P99. He uses this gun at the beginning of the film on the Q-Boat, when at the oil rig (pipeline) and when in the submarine at the end. They are the three main times within the film. I would like to recreate this and use this at the beginning of my trailer with the fire of a bullet.
Subscribe to:
Posts (Atom)